We already ran into this twice, our @SDNCast website was down again as our SSL-certificates expired. The certificates are only valid for three months by default so every time after three months this would happen again.
Also, and Google actively started to ‘block’ so called ‘unsafe’ websites as of today, more and more browsers will refuse to open these ‘unsafe’ websites, so we had to find a solution for our beautiful website to keep our website containing our weekly SDN Cast recordings in the air.
If you think, as I did until today, that your website does not contains information that you need to protect by using HTTPS, think again! The point is, it is not that you are leaking information, but it allows others to inject information into -your- website that could be malicious or simply incorrect.
To convince you, watch this video from @TroyHunt :
https://www.troyhunt.com/heres-why-your-static-website-needs-https
I won’t go much into detail on what HTTPS (HTTP Secure) is or what SSL or TLS is. There has already been written enough on this that you can find on the Interwebs, but I’ll add some reference links below this article in order for you to look at if you want to know more about it. For now, it’s just about how to get it to work and make sure that it keeps working.
Our SDN Cast website runs in the ‘Cloud’, in Azure to be precise, and runs there as an App Service. It appears that there is an extension available that allows you to request for an SSL certificate and keeps it up to date even after three months so it automagically renews the certificate when needed.
This extension uses the services of Let’s Encrypt.
Let’s Encrypt is a free, automated and open Certificate Authority (CA) and was specifically created to support the public in providing free certificates. It’s a service provided by the Internet Security Research Group (ISRG). The idea is to get at as many places as possible with not too much effort and most and for all at no costs to provide the Internet with digital certificates to build a safer and privacy respecting Web.
What do you need to do?
· Get an SSL-certificate supporting App Service
· Create a Service Principal
· Allow the Service Principal access to your App Service
· Create a Storage Account
· Install the Let’s Encrypt Extension
· Configure the Extension
Supporting SSL and Custom Domains
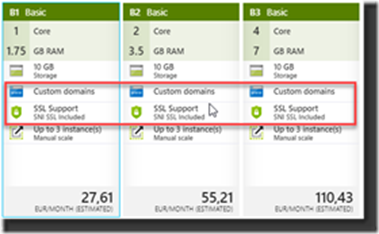
Not all App Service levels allow you to use Custom Domains and/or SSL. So, make sure you are on the right level of your selected App Service and see if you can use it on your level. If not? Level Up! It’s still relatively cheap and the chance is that you already in the right level but just did not enable it. Well that changes today!
In general, you can say that the Basic Tiers are offering the options already. The Free and Shared Tier are not supporting this at the time of writing so if you selected that one previously you will need to scale up and upgrade to a higher Tier to enable this.
Create a Service Principal
To allow you to request or renew certificates without the touch of a Human you will appoint a Contributor to your App Service that you create in your Azure Active Directory. So, what you are doing is creating a Service Principal (a set of credentials) that will allow you to do the work for you whenever a new certificate is needed through automation.
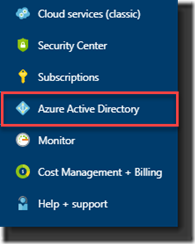
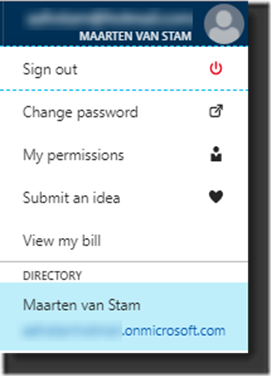
1. Open Azure Active Directory (make sure you work from the right tenant and select the tenant where the App Service is located if you have more than one tenant)
2. Go to App registrations and create a New Application Registration
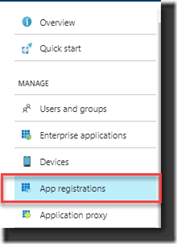
Make sure you selected All apps in your List box, otherwise you won’t see the registration after creating the registration:
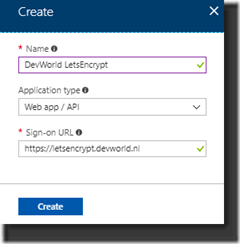
In the process of creating the Application Registration you enter the Name for the Service Principal, select Web app/API at Application Type and think of a specific URL to enter at Sign-on URL.
This URL is not validated so it can be any sub domain for the site you are creating your SSL-certificates for. In my example I used https://letsencrypt.devworld.nl , a non-existing URL.
3. Create the Application Registration
After creating your Registration it will appear in the list:
The Service Principal is unique identified by the Application ID. Take a note, write it down, you’ll need it later.
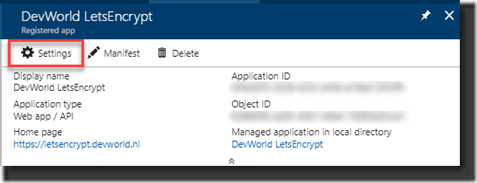
Select the Application Registration and in the screen that opens select Settings:
4. Create a Key
Under Settings select the option Keys. We now will add a Key that will be used to authenticate the Service Principal.
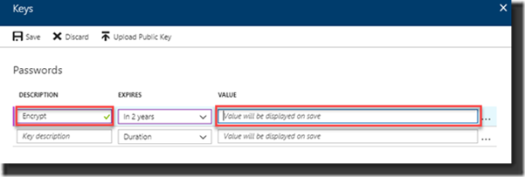
Enter the Description, think about the lifetime for expiring – how long do you want the Key to be valid and click Save. On saving the Key the Value will be generated. Again, make sure you write down this value as you will need it later in the process. If you don’t and/or forgot the Value, you will need to create another one as they can’t be handed to you after closing (and try to remember this time!).
That’s all, the Service Principal has been created and now we assign it to the Resource Group running the App Service to allow the Service Principal to access the Resources.
Providing access to the Service Principal
Now you created the Service Principal it should get access rights as a “Contributor” to the Resource Groups containing the App Service Plan and the App Service. If they are both in separate Resource Groups add the Service Principal to both Resource Groups.
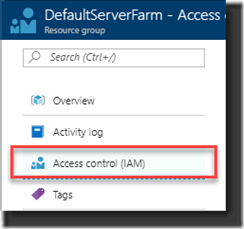
1. Open Access Control at the Resource Group
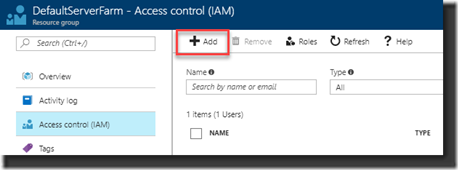
2. Click Add to add the Service Principal as ‘Contributor’ of the Resource Group:
3. Enter the Role by selecting the Contributor role, providing access to Azure AD user, group, or application and select the Service Principal you just created by selecting it from the list under Select:
4. Click Save to assign the permissions: 
Create a Storage Account
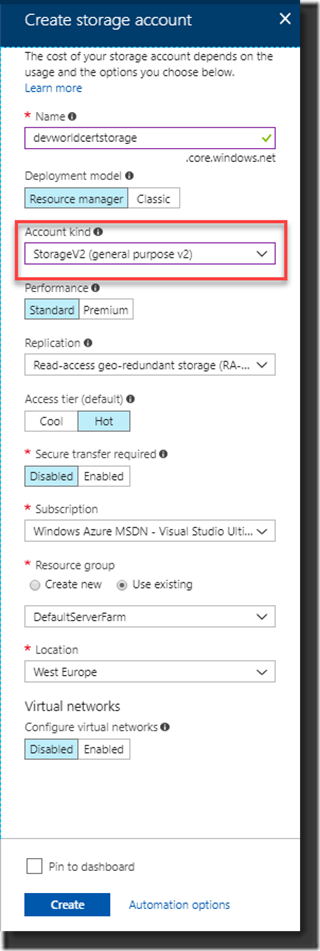
To keep track of the certificate state Let’s Encrypt extension uses a Storage Account. You need to create this if you haven’t already done so (you could use an existing Storage Account, but it needs to be one of the Generic types, Blob Storage alone is not enough).
1. Create the Storage Account.
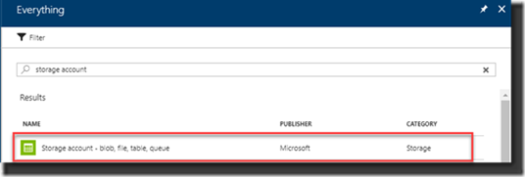
Select from the list of Azure Resources the Storage Account Option and create it
2. As said, make sure the Storage Account kind is created with Generic Purpose.
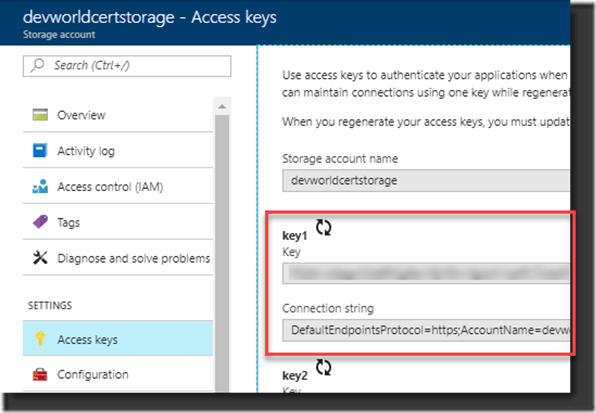
3. Copy the Connection string from the first key key1, this value will provide access for the Let’s Encrypt extension to the Storage Account. Select and copy the Connection string (there is a lot to remember as you can see .
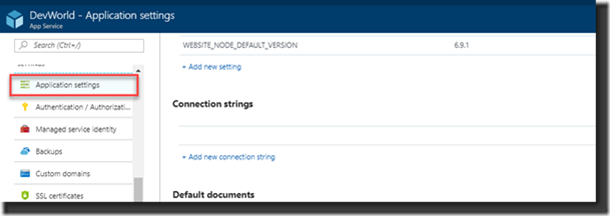
4. Go to your App Service and select Application Settings:
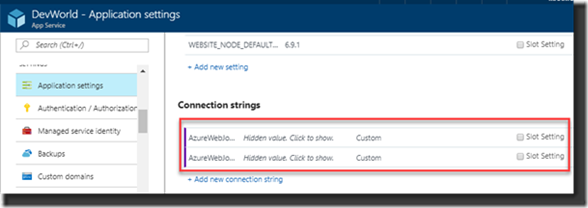
5. Now add two twee Connection strings with the names: AzureWebJobsDashboard en AzureWebJobsStorage
Each of these settings will be in the form of DefaultEndpointsProtocol=https;AccountName=[myaccount];AccountKey=[mykey];
Make sure your connection strings don’t end with the part EndpointSuffix=core.windows.net. This -is- part of the Connection String you just created at the storage account, but you need to remove this to make it work otherwise it will fail.
Add the Let’s Encrypt Extension
Now that we have done all the preparations, it all looks very complex but if you look back afterwards it will become a bit clearer to you and you’ll see why it was needed.
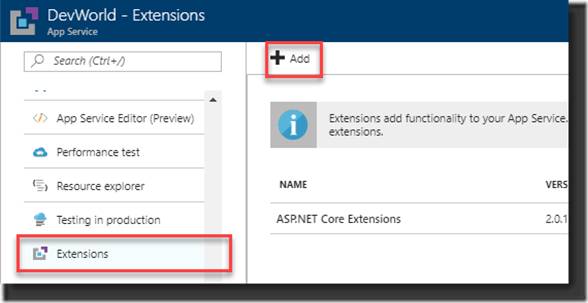
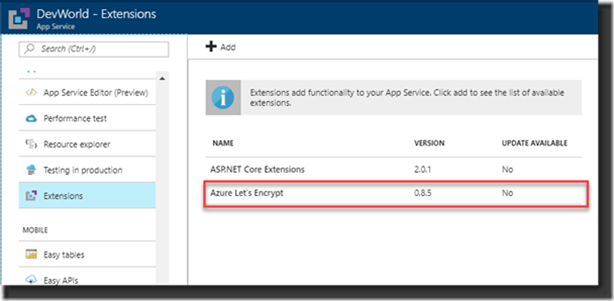
1. Select the option Extensions from your App Service options and click Add to select the extension:
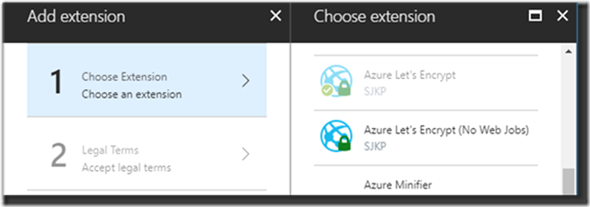
2. Select the Azure Let’s Encrypt extension. There used to be three, there are now only two, the one without and the one with Web job that takes care of renewing the certificate. At the time there where three where the story goes that the 64 bits version wasn’t all too stable. At that time, I selected the 32 bits version but today there is just the option to pick the extension with the Webjob:
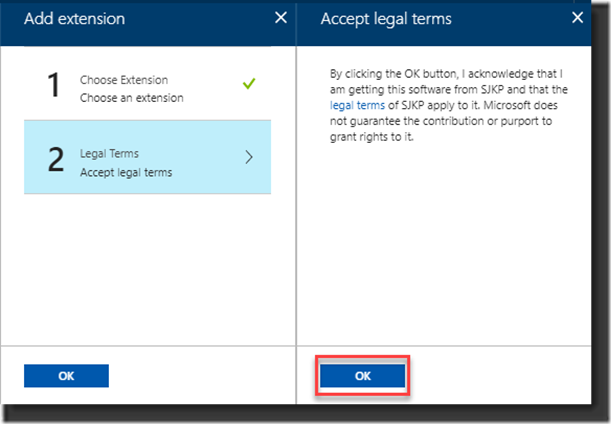
3. Accept the Legal Terms by clicking OK
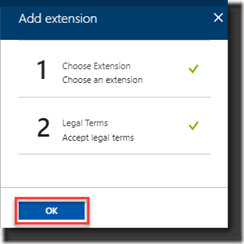
4. And another OK to finalize it
The extension has now been added to the App Service but to properly initialize and run it you need to restart the App Service otherwise you’ll see some issues in the next few steps.
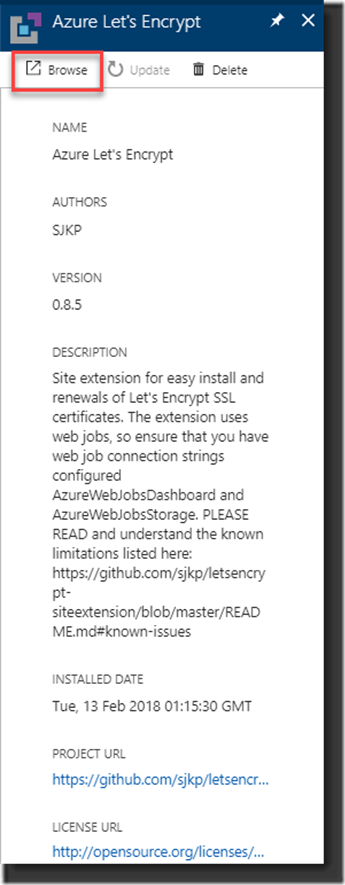
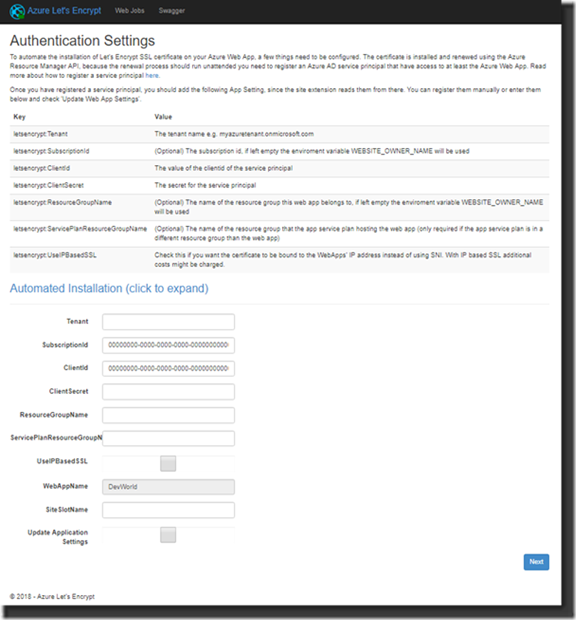
5. Open the selected extension that you just added and click the Browse button to fill out the properties needed for it to run:
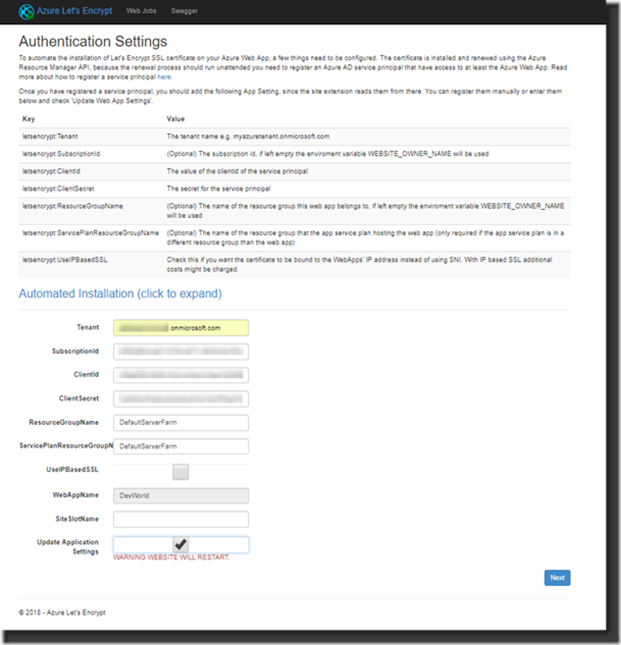
6. Entering all the authentication properties needed to run the WebJob properly is our next step. These will be added by the extension to the App Service.
7. Tenant ID, this is the tenant ID that belongs to the Resource Group and looks like yourdomain.onmicrosoft.com.
8. Subscription ID is the ID of the Azure Subscription, you can find this on the Subscriptions Blade:
https://portal.azure.com/#blade/Microsoft_Azure_Billing/SubscriptionsBlade
9. Client ID is the Application ID of the Service Principal that you wrote down earlier in one of the steps above.
10. Client Secret is the Service Principal Key that you kept for later use just like the Application ID.
11. Enter the Resource Group name of the App Service and the Service Plan. Usually they will be the same, if not enter them separately for each Resource Group.
12. The WebAppName is already there by default, the SiteSlotName can be kept empty and the Update Application Settings should be enabled by checking the checkbox to checked.
13. Make sure everything is entered properly and click Next:
14. At this time the settings will be applied:
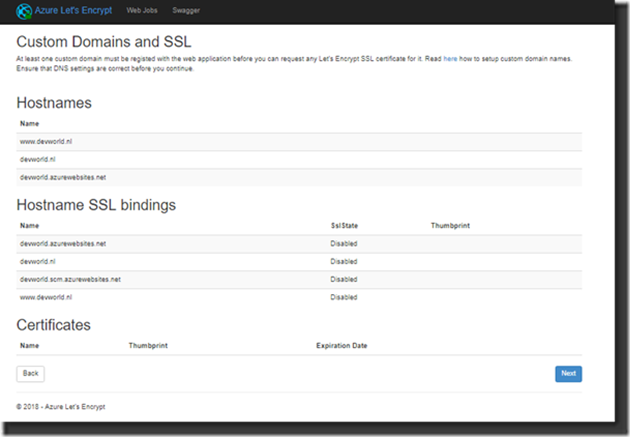
15. An overview is shown with the settings that it found. At this time, you should see the Custom Domain names applicable. Right now, they are still not bound to SSL because the certificates need to be assigned. Click Next …
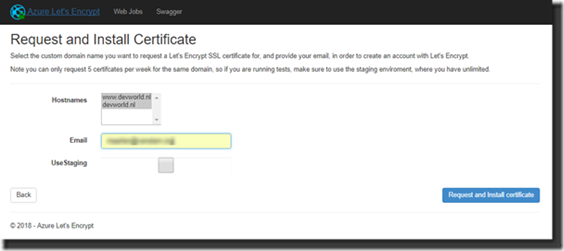
At this time you will start to request and install the actual certificates for you App Service. Select the Hostnames where you want the certificates to be activated and enter the email address where you want to receive any notifications related to this registration when they expire so you can check if you don’t trust the process. Click Request and Install Certificate
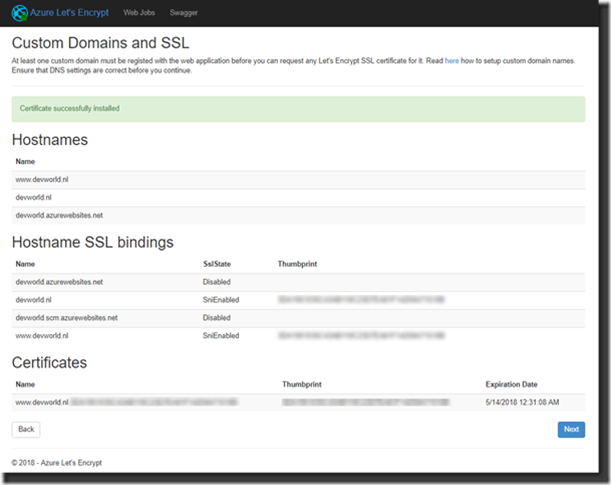
If all went as it should go you should now get an overview where you can see the requested hostnames now provided with SSL bindings and the certificates!
Results
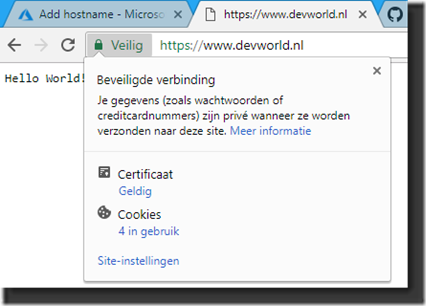
It’s time to check the results to see if everything is the way we would expect. Let’s check the website and see if it now is ‘safe’:
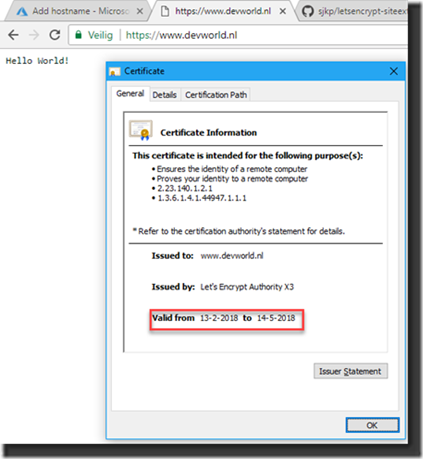
As we can see on my test-website that I used it is now provided with the “Safe” symbol, the green lock and it appears to have a Valid Certificate attached to the website. We reached our goal, we secured our website with a certificate. Let’s have a look at the certificate:
We now see that the certificate is published by Let’s Encrypt Authority X3 and is about valid for three months (in fact, exactly three months but the image is from the date I initially created the image in my Dutch article that I published in our Dutch SDN Magazine).
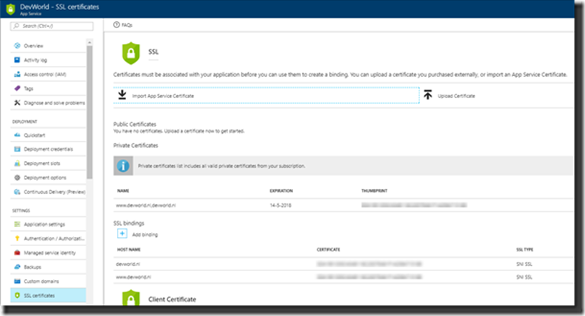
Looking at the SSL-settings on the App Service we can also see that the certificate has been attached and the SSL-bindings are in place related to the certificate.
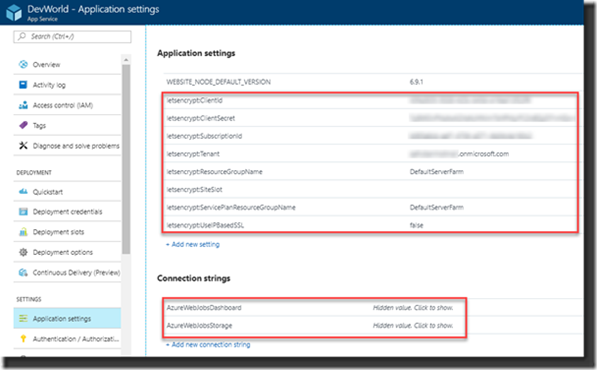
Now if you look at Application Settings on the App Service you’ll see that many of the settings that you’ve seen earlier when creating the added extension now returned in a list of “Let’s Encrypt” variables. Inspecting them will show you that this information is also used at the certificate itself.
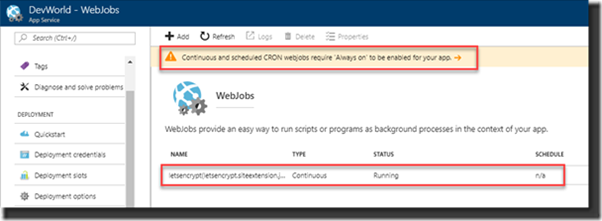
Last check will be at the created Webjob to see if this one is also active. The Webjob should be running to be able to renew the certificate in three months.
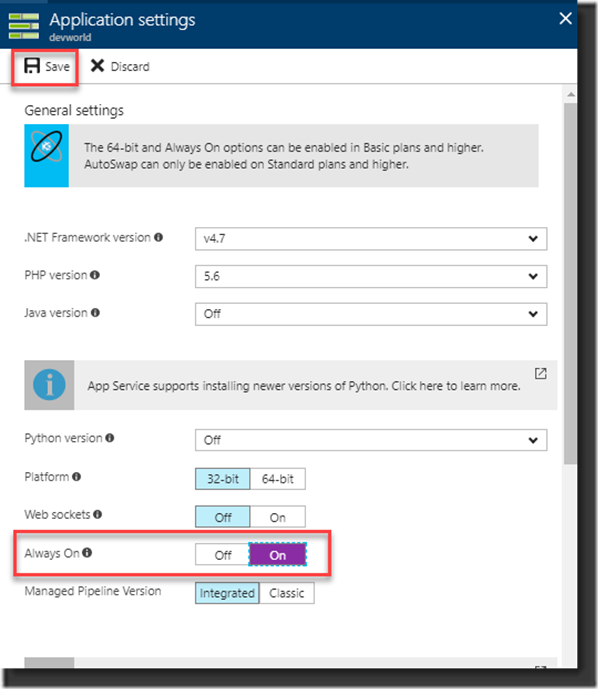
Here however we see a message on the page that indicates the App Service should be “Always on” for it to run properly. Therefore, click the link in the message to go the specific setting to enable the Always On option.
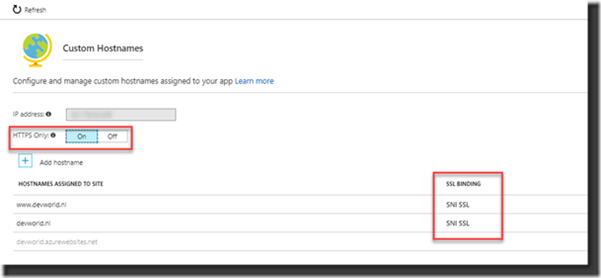
As a real final step, you also need to check the HTTPS Only setting is enabled at the Custom Hostnames settings to make sure the website is always accessed over HTTPS:
If you look at it from here we’ve been going over a lot of steps but if you do it properly it’s quite logical. Now all we can do is wait for three months to see if your certificates really are renewed. If all goes well we won’t need to create our certificates anymore, no manual tasks and no administration to keep track of the certificates (unless you set a time limitation on the Principal Key )
References:
HTTPS: https://en.wikipedia.org/wiki/HTTPS
Let’s Encrypt: https://letsencrypt.org
Maarten van Stam
Manager at Deloitte Accountants and responsible for Software Development in the Professional Practice Department.
Also Software Engineer, Solution Architect, MVP, Technology Watcher, Member of Microsoft Office 14 Developer Advisory Council, Organizer in Software Development Network user group community, Web Caster and speaker at developer events and much, much more!
LinkedIn:
https://www.linkedin.com/in/aafvstam/

