Yes! 100 SDN Cast Subscribers

SDNCast 100 Subs

After fifteen months of hard work, creating a weekly live webcast called SDN Cast Marcel Meijer (@marcelmeijer), Fanie Reynders (@faniereynders) and I (@aafvstam) we reached the milestone of 100 subscribers of our YouTube channel. That may sound as a low number and sure, compared to some popular YouTube celebs this is, but our webcast is a bit of a niche product.

First, our webcast in general is Dutch except if we have guests in the show not speaking Dutch. In that case we obviously switch to English. Most webcasts are however in Dutch.

Second, the subject of Software Development is not the most popular subject on the interwebs for ‘normal’ human beings outside our little group of developers. And because we target the even smaller group of -Dutch- developers the number of potential subscribers is even lower.

Third, the number of Developers watching YouTube webcasts (especially live) is even lower.

We discuss news and events of the week and try to push in some demos or guests. Sometimes we do specials on location, we always try to be live on Thursdays 8 PM UTC+1.

So why are we doing this?

Well, first of all … it is fun to do!

Second, it keeps you focused. We are forced to monitor what is going on in the market and keep ourselves up to date. Everyone knows the feeling that you have to catch a deadline to do something, and just because the deadline is there you are forced to get your behind out of your lazy chair and get something done (in this case, we need to get into the chair to do some real computer stuff).

Third, we try to get in touch with authors, presenters or other potential guests to show us what they have an can do to writer articles, do presentations at our events or simply share thoughts in our webcasts.

Anyway, I’d like to thank all 100 subscribers to our YouTube Channel for your trust and let’s work on the next 100 subscribers! If you want to share your comments please do so, let us know what we can do better or if you want to join us in our show as a guest: Ping us, leave a Tweet or Google us, I’m sure you can find us.

Subscribe

If you haven’t done so already: http://www.sdncast.nl/subscribe !
SDN Cast 62 – Release flavors

clip_image002

In our Dutch SDN Cast 62 we discuss several releases of frameworks and tools. But things tend to get confusing these days. We see RTM, Release to Manufacturer or is it Release to Market. Candidates for Release with RCs – Release Candidates, Early Access, (General) Availability, Beta or Final. And then there are the Insider Programs with their release flight rings. The Xbox release flights are called Preview Alpha, Preview Beta, Preview Delta and Preview Omega …

Does it get weirder than this? We’ll see … at least there is something released.

Where can you find our 62th episode of our Dutch SDN Cast?
https://youtu.be/dcnzI2BxmTE

Did you subscribe our Dutch SDN Cast channel already?

Subscribe your YouTube channel if you don’t want to miss a single broadcast. Usually we will broadcast on Thursday evenings at 8 PM but there can be a change of plans where we need to move to another time or day. So to be sure Subscribe to our channel on YouTube or go to http://www.sdncast.nl to see when the next episode is due.

Other news:

Rider 2017.1 – JetBrains .NET IDE hits RTM
https://blog.jetbrains.com/dotnet/2017/08/03/rider-2017-1-jetbrains-net-ide-hits-rtm/

SQL Server 2017 Release Candidate 2 (RC2) is now available
https://blogs.technet.microsoft.com/dataplatforminsider/2017/08/02/sql-server-2017-release-candidate-2-rc2-is-now-available/

Welcome to the .NET Framework 4.7.1 Early Access!
https://blogs.msdn.microsoft.com/dotnet/2017/08/07/welcome-to-the-net-framework-4-7-1-early-access

Small Basic 1.3 available now!
https://blogs.msdn.microsoft.com/smallbasic/2017/08/07/small-basic-1-3-available-now
http://smallbasic.com/about.aspx

Creating Materials and Lights in the Visual Layer
https://blogs.windows.com/buildingapps/2017/08/04/creating-materials-lights-visual-layer

Xcode 9 beta 5
https://developer.apple.com/news/?id=07102017a

.NET Standard 2.0 is final
https://github.com/dotnet/announcements/issues/24
https://github.com/dotnet/standard/blob/master/docs/versions/netstandard2.0.md

Xbox Insider Program
https://news.xbox.com/2017/08/09/fans-can-join-xbox-insider-program

Nuget Fall 2017 Roadmap
https://blog.nuget.org/20170809/NuGet-Fall-2017-Roadmap.html

Web Applications with ASP.NET Core Architecture and Patterns guidance
https://blogs.msdn.microsoft.com/dotnet/2017/08/09/web-apps-aspnetcore-architecture-guidance/

Events

Upcoming events

Agile 2017 – August 7-11 2017, Orlando FL
https://www.agilealliance.org/agile2017/

MvvmCross .NET Summer Hackfest, August 21-September 2, Amsterdam Closing Event
https://www.mvvmcross.com/hackfest

Google Developer Days Europe – September 5-6, Krakow, Poland
https://developers.google.com/events/gdd-europe/

Wazug – September 7 2017, Hilversum

Microsoft Edge Web Summit 2017 – September 13, Online
https://summit.microsoftedge.com/

MixUG – Development Event – 13 September, Gouda
https://www.eventbrite.nl/e/tickets-mixug-development-evenement-34890959800

Xamarin Dev Days – 16 September – Amsterdam
https://ti.to/xamarin/dev-days-amsterdam-2017

.NET Conf – 19-21 September
http://www.dotnetconf.net/

Microsoft Envision – September 25-27 – Orlando
https://www.microsoft.com/en-us/envision/default.aspx

Ignite 2017 – September 25-29 – Orlando
https://ignite.microsoft.com

Hybrid IT Event – September 26 – Maarssen, NL
http://www.fujitsu.com/nl/microsites/hybrid-it/event/index.html

Xamarin Event – September 28, Nieuwegein
http://events.4dotnet.nl/xamarin-event/

MixUG – Eindgebruikers Evenement
https://www.eventbrite.nl/e/tickets-mixug-eindgebruikers-evenement-34890983872

SDN Event 3 – 6 October 6, Zeist, NL
https://www.sdn.nl/EVENTS/6-oktober-2017

TechDays October 12-13, 2017 RAI Amsterdam
http://www.techdays.nl/
https://techdays.msnlevents.net/content/eventselection.aspx?eventid=26152

SharePoint Saturday Belgium 2017, October 21, Brussels BE
http://www.spsevents.org/city/brussels/brussels2017

SharePoint Unite – October 24-26, 2017, Haarlem
https://sharepointunite.com/

Web Summit – 6-9 November 2017, Lissabon, Portugal
https://websummit.com/

Visual Studio Live! November 12-17 2017 Orlando, FL
https://live360events.com/events/orlando-2017/vslive.aspx

As usual we are always looking for presenters for our own events and Meetup’s so if you want to share something about hot technologies or just about something you implemented at work or in an App that could be interesting to our audience let us know so we can schedule you for one or our next SDN events or Dutch .NET Group Meetups.

This off course also goes for if you want to write a great article for us to publish in our SDN Magazines or at our SDN Website. The downside of publishing a magazine article is that there can be some time between writing the article and publishing the magazine. So, if it is time critical sometimes the best option is to publish it on the www.sdn.nl website to get more speedy attention to the article.

As you see, options enough to address your audience with top notch information. You can even, if you like, be our guest in our SDN Cast shows to discuss the projects you are working on or other topics you master. We will instruct you how to connect with us and what it is you need to join the show.

Hopefully we will see you at our weekly web cast, for the schedule go to www.sdncast.nl for next week’s announcement to find out the day and time of our next broadcast or go to www.sdncast.nl/youtube to watch old episodes and videos that we recorded at our events. Don’t forget to subscribe our YouTube channel www.sdncast.nl/subscribe or go directly to YouTube not to miss any of our shows!

Office Development – Fixing Trusted Authority – Word Client

Office Development - Running Add-in Word Client

Yesterday we’ve seen an issue installing a Word Add-in when the certificate used in the Add-in is not (yet) trusted:

clip_image002

To solve this, we need to add the server certificate as a trusted authority to the certificate store. In my post Office Development – Fixing Certificate Issue with OpenSSL Certificate I already showed you how to create the certificate. I even announced that I had to add the certificate to the trusted root certificates but, in the end, never did that – resulting in the issue above.

Clean up the installed Add-in

First, let’s clean up the installed Add-in to re-do the installation later on to see if it installs correctly after adding the certificate to the trusted root certificates.

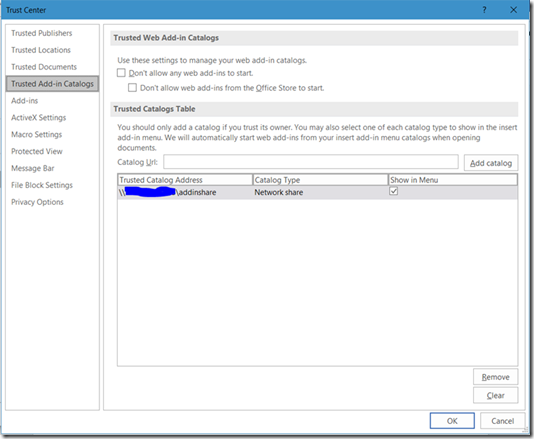
Go back to the File/Options/Trust Center/Trust Center Settings … button and click it

clip_image004

Select the Trusted Catalog Address, click Remove and click OK to close the dialog. You’ll get a message that it will be effective when you close and open Word again.

Close Word to get it done.

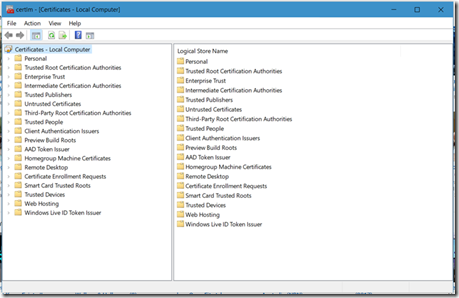
Now start the certificate manager:
C:\Windows\System32\certmgr.msc

clip_image006

Select the Trusted Root Certification Authorities node, right click, All Tasks, Import …

clip_image008

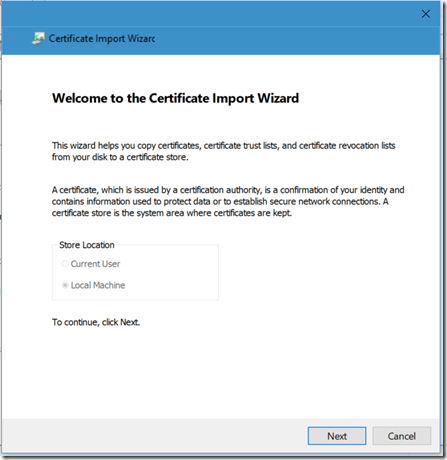
clip_image010

Click Next to continue

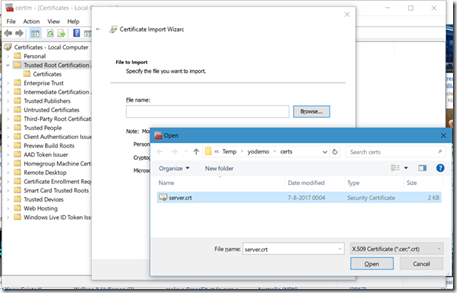
clip_image012

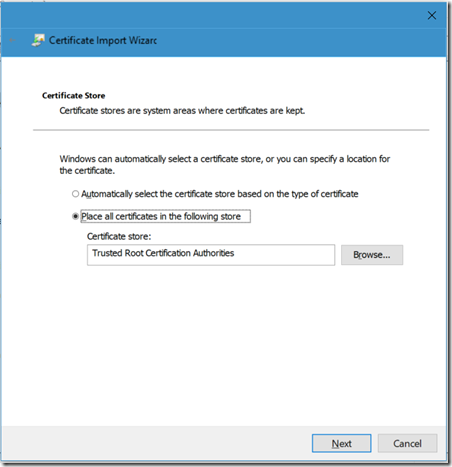
Select the server certificate from the Add-in folder that you created while generating the certificate. Click Open and add the certificate.

clip_image014

Click Next

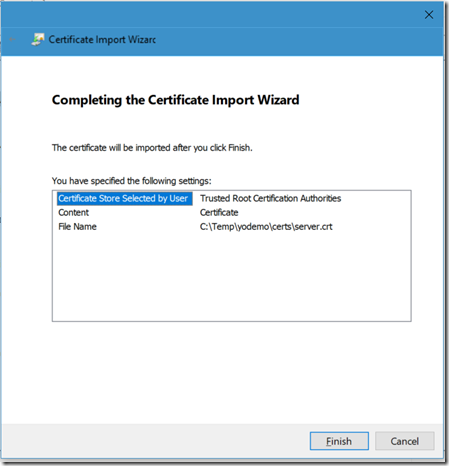
clip_image016

And … Finish to complete the certificate installation.

Install the Word Add-in again

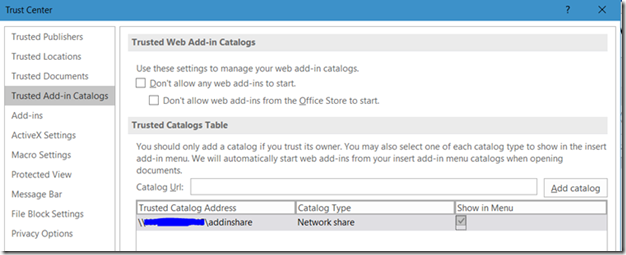
Repeating the steps from the previous post, go to File/Options/Trust Center/Trust Center Settings … button and click it.

clip_image018

Add the network share again, don’t forget to check the checkbox. Close the dialogs and if you get this message below, close Word and start it again.

clip_image020

Now go to the Insert Tab and click My Add-ins.

clip_image022

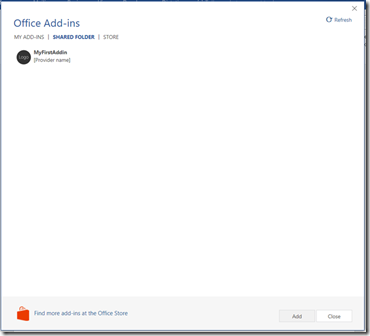
Repeating the sequence that we did in our previous post, go to the Insert tab and click My Add-ins.

clip_image024

From the SHARED FOLDER tab select your Add-in again and click Add. Immediately you see the button at the Home Tab in the Commands Group.

clip_image026

And if you now click the button, the Add-in is now loaded without issues. No more warnings for security issues or incorrectly named certificates. It just runs.

clip_image028

So, what have we learned today

– Make sure your security is in place. Prepare your certificates with the correct names on the certificate and add it to the trusted root certificates.

(Note: most of these issues are originated by creating self signed certificates. When using commercially generated certificates most of these certificates already come from trusted root certificates)

– Cleaning (removing) installed Add-ins is not so trivial as you might expect. We had to remove the Catalog entry, closing Office and reopen Office clears the Add-in. It would be easier if the user interface provided an option to remove the Add-in in an easier manner.

(Note: removing the Add-in from Word Online is even worse. I asked the question on StackOverflow where it was confirmed that there is no easy remove option)

Recap

So far, we installed NodeJS, Git, Yeoman and created a simple Add-in. Next, we tried to install it on Word Online, fixed some security issues, installed it on the Word local client, fixed some more security issues and finally installed it on the local Word client again, this time without issues.

Not much interaction yet between the Add-in and Word but we’ll look at that later.

To be continued …

Office Development–Running Word Add-in on your local Word client

clip_image002

In my last post Office Development – Running Word Online Add-in I explained how to install your Add-in to use in Word Online. Today we will bring the same Add-in into your local Word client installation, Word 2016:

clip_image004

To do so you first need to start your ‘web server’ again by calling

npm start

from the root of your Add-in folder.

Now you have your ‘web server’ up and running and we need to make this visible for Word. Word is able to ‘see’ Add-ins that are exposed by manifest files in a shared network location or web URL. Today we will use the shared network location to expose the manifest file.

To create a shared network location, you simply create a dedicated folder on your machine:

clip_image006

In this case I just created an extra folder in the Add-in project called addinshare.

Don’t forget to copy the manifest file “my-first-addin-manifest.xml” to the just created folder!

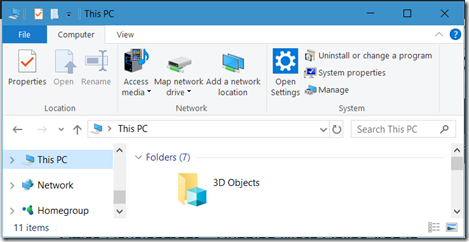
Now create the network share by opening the Explorer. Go to “This PC” and select from the menu/ribbon “Manage”

clip_image008

This will open the Computer Management tool. Browse in the left tree to Computer Management\System Tools\Shared Folders\Shares, select it:

clip_image010

Select Action, New Share:

clip_image012

Go to the folder that you dedicated for your Add-in

clip_image014

clip_image016

Click Next to continue

clip_image018

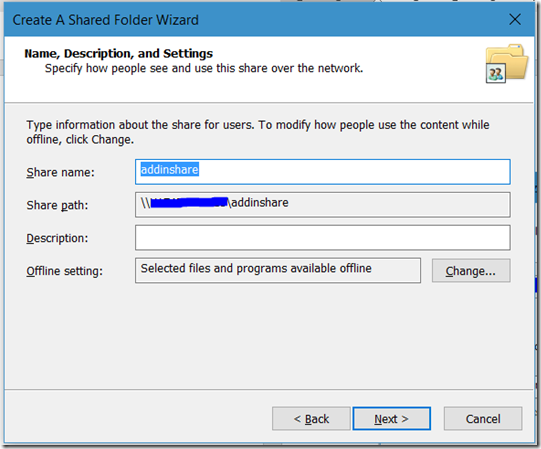
If you like change the name of the share, and click Next

clip_image020

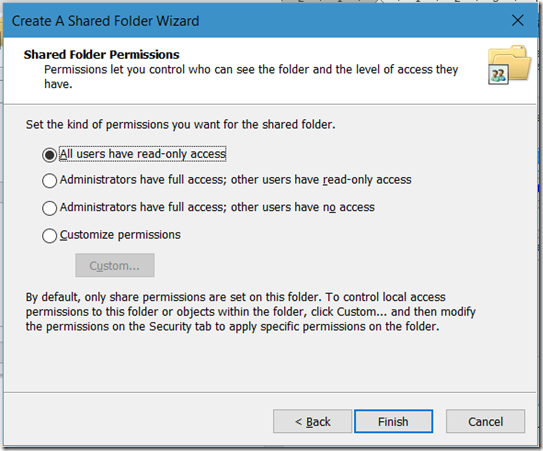
For now, add All Users have read-only access (you might want to change the access rights later on but for demo purposes pick the default) and click Finish.

clip_image022

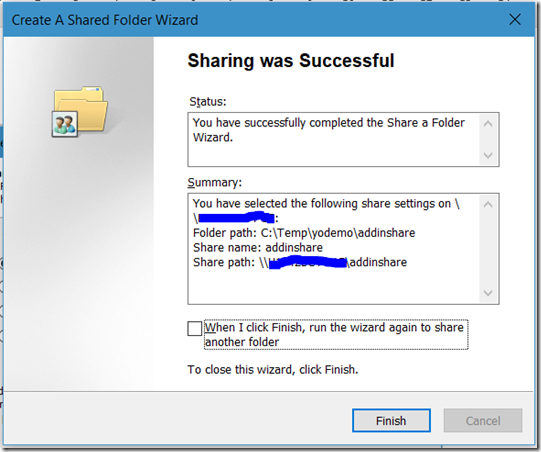
Click Finish again to close the dialog and close the Management Tool.

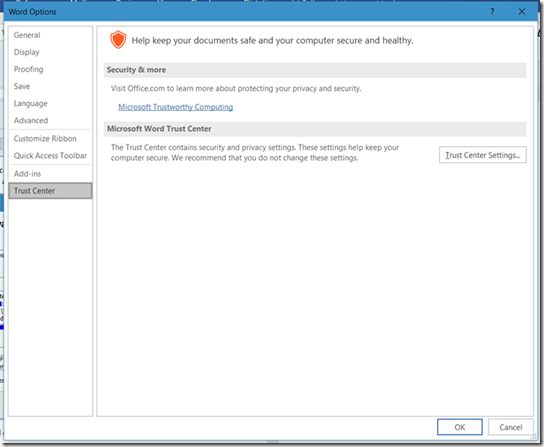
Now back to Word, goto the Trust Center under File, Options, Tab Trust Center, Button “Trust Center Settings …”

clip_image024

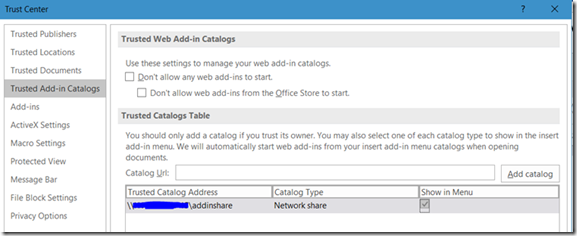
On the left side select “Trusted Add-in Catalog” and in the Catalog URL enter the network share from your computer \\<computername>\<sharename> that you just created in the previous steps. Click Add catalog to push it in the list.

When added to the list, check the checkbox Show in Menu to make it available in Word.

Note: Before clicking “Add catalog” it would be a good thing to check in Explorer that your folder spelling of the shared folder is correct and is opened without issues.

clip_image026

Click OK twice to close the dialogs. You may see this as well:

clip_image028

If all went right you should be able to add your Add-in to Word. Close all instances of Word and restart Word.

Go to the Insert Tab, just like you did in Word Online from the previous post and click My Add-ins:

clip_image030

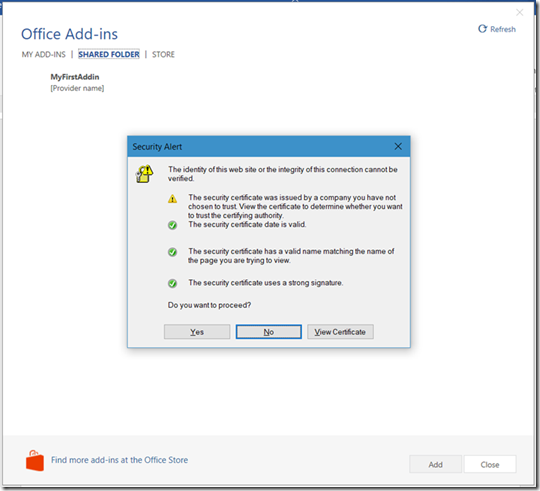
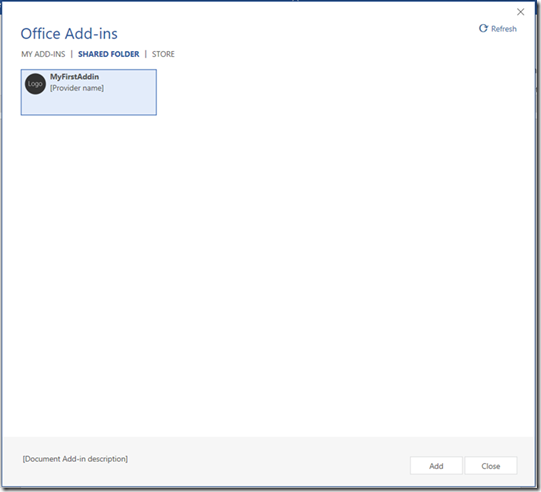
Clicking the My Add-ins button in the ribbon will give you the dialog below if you select the option SHARED FOLDER (notice that Word recognized the share and provided you with this menu option. If the share wasn’t recognized the option for SHARED FOLDER would not appear).

clip_image032

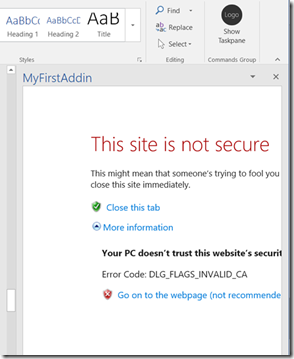
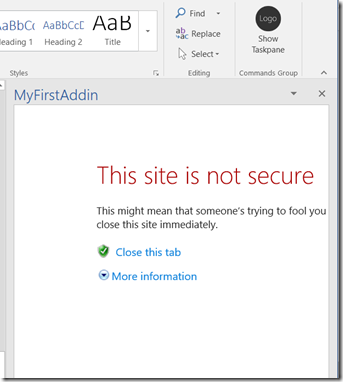
What is up? Didn’t we fix the certificate issue? We had it running in the browser, didn’t we?

Well, yes … but what I forgot was to add the certificate to the list of trusted authorities. For now we can go on, we know it is safe but we need to fix this later on (food for another blogpost ).

Click Yes to confirm, select the MyFirstAddin an click Add.

clip_image034

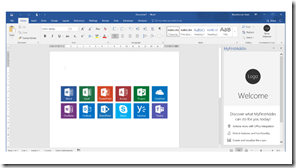
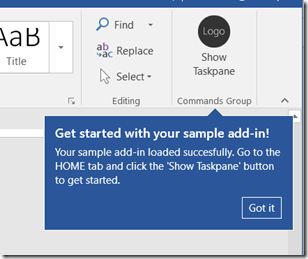
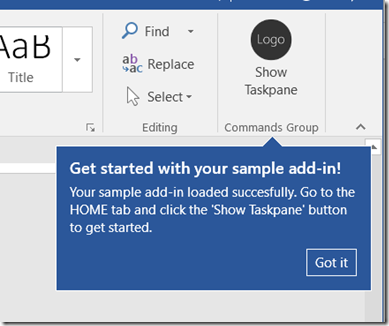
After closing the dialog by clicking Add a new Ribbon item is added to your Word Home Tab:

clip_image036

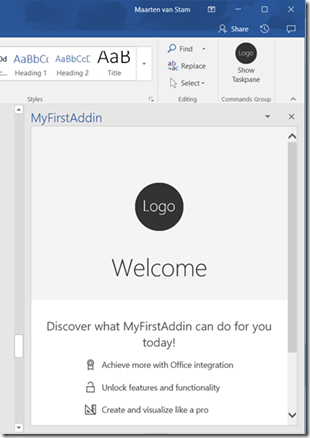
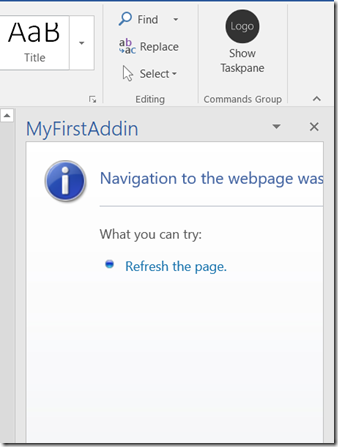
Kinda useless information, you are already on the HOME tab … nevertheless, click the “Show Taskpane” button to get started. For me this resulted in:

clip_image038

Sh*t happens so I refreshed the page, to see what happened:

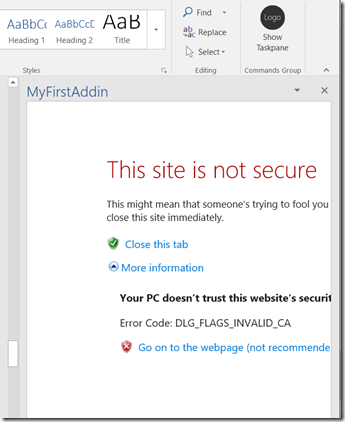
clip_image040

A bit better, but still not right. This time we recognized the “not secure” warning. My own fault, it still needs the trusted authority fix. For now, click More information:

clip_image042

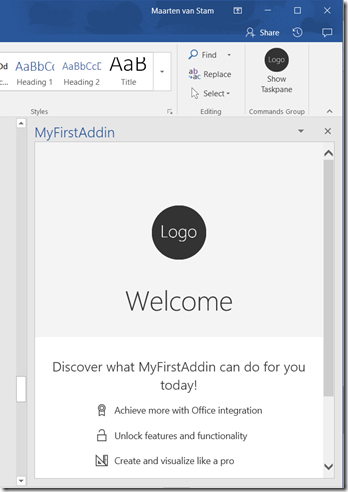
This opens up the option to Go on to the webpage (not recommended). We know it is ok in this case, if the source was unknown you should just back out and close the add-in. In this case we created it, know it is secure so we go on to the website, although it was not recommended. We like to be a little bit stubborn at times and there you have it, it worked:

clip_image044

Quite a journey again, still not flawless but cause by my own doing. We now have the Add-in running in both Word Online and in Word 2016 on your local machine.

In our next step, I’ll add the certificate to the trusted authorities to redo this without issues, hopefully…

To be continued

Office Development – Running Word Online Add-in

Office Development - Running Add-in

What we’ve seen so far is that we installed NodeJS, Git, Yeoman and fixed a security issue. All if this to create a basic ‘hello world’ Add-in. I must be honest and admit that running your first VBA add-in was a lot easier and running out of the box with just a few lines of code.

But let’s go on. We did run the Add-in as a website, but not as a real Add-in in the Word client. The instructions explain that the easiest thing to do would be to use Word Online. So here we go:

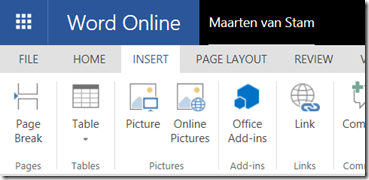
Open Word Online, go to the Insert Tab

clip_image002

Click the Office Add-ins button

clip_image004

On the top right select “Manage My Add-ins” to upload the Add-in manifest

clip_image006

Click Browse to find the Add-in manifest file

clip_image008

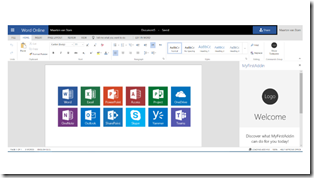
After uploading the manifest, you should see the Show Taskpane button appear in the Commands Group and if you click the button the Task pane appears showing you exactly what you’ve seen in our earlier blogpost:

clip_image010

And there you have it … your first Add-in running in the Word client. Congratulations.

I do have to admit that it didn’t work immediately … I had to upload the manifest more than once to get it to work. At first my icon didn’t appear, the group did but the Task pane didn’t load either after clicking the ‘no icon’-button. Trying again solved it (no clue to why the first attempt failed).

Obviously, the scenario we’ve seen so far won’t work ‘in production’. The Add-in website is currently still running on your local machine at a specific port (3000 in this case) and adding the Add-in using Word Online is not directly the most optimal way to get your Add-in up and running.

Our journey of research is apparently not ready yet. We need to overcome the ‘demo’ instructions and see if we can get it closer to a production ready system. I think my next step would be to find out how to run the Add-in in the Word client running on the desktop. Maybe the next step after that to run it on a Mac.

This all is still just running the Add-in, we haven’t seen any interaction with the documents. No fear, we will get there … I’m sure so keep with me and hang in here.

To be continued …

Office Development – Fixing Certificate Issue with OpenSSL Certificate

clip_image002

Yesterday we’ve developed our first Add-in for Word, that is – the web ‘site’ that represents the Add-in. We did however run into an issue where the certificate for the website wasn’t recognized due to the different naming on the certificate. Also, the certificate wasn’t trusted so even if we had a correct named certificate we needed to add it to the trusted root certificates.

Let’s fix the naming issue first. To do so we need to create a new certificate with the right name on it. There are a couple of options to do this. For now, I will be using OpenSSL to create this new certificate.

To do so you’ll need to install some tooling to support OpenSSL on your Windows machine. You can download it here:

https://slproweb.com/products/Win32OpenSSL.html

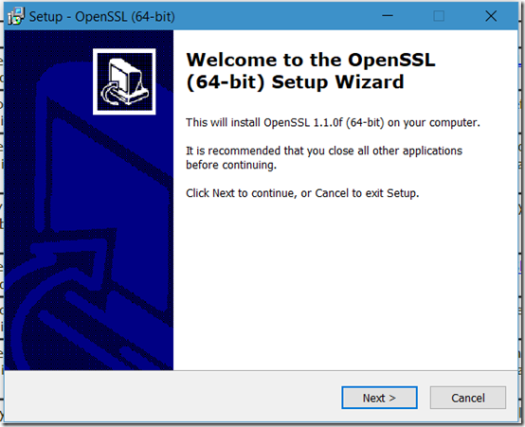
From the downloads, I installed the Win64 OpenSSL v1.1.0f version. By the time you read this it may have been updated to a newer version. Just check the list of downloads to see what the current version is.

Installing Win64 OpenSSL v1.1.0f

clip_image004

Installing is fairly trivial, just follow the instructions, click Next

clip_image006

Accept the agreement (or don’t but you won’t get the software then ) and click Next again.

clip_image008

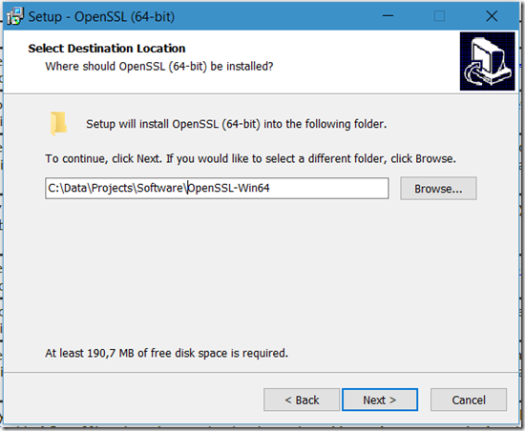
Select the path where you want to install the software. Initially it opts to install it in the root of the C:\ drive, but I prefer not to put it in the root of my drive so I’ve changed this to put it in my data folder. Click Next.

clip_image010

Accept the default and click Next.

clip_image012

Again, I prefer not to install directly into my system directory so I changed the default to “The OpenSSL binaries (/bin) directory. Click Next.

clip_image014

Click Install to install the software

clip_image016

Optionally you are asked to support the Windows OpenSSL software by donating an amount of money. Feel free to what you think it is worth and click Finish.

Now you can find the installed software in the location specified in step 3 of the installation process.

To create the certificate in your Word Add-in projects you need to create a subfolder in the root of your Add-in project:

Create a .\certs folder in the project

Copy openssl.cnf from (in my case) C:\Data\Projects\Software\OpenSSL-Win64\bin\cnf into the certs folder you just created in the previous step

Open the .\certs\openssl.cnf file and add the following to the end of the file:

[ SAN ]

subjectAltName=DNS:localhost

Open a command window and run the command from the .\certs folder:

C:\Data\Projects\Software\OpenSSL-Win64\bin\openssl genrsa -des3 -out server.key 2048

This will generate the private key. In this process, you need to enter a password twice:

clip_image018

Next you will be generating the certificate request:

C:\Data\Projects\Software\OpenSSL-Win64\bin\openssl req -new -sha256 -key server.key -out server.csr -subj /CN=localhost -reqexts SAN -config openssl.cnf

You will need to enter the previously inserted password again here.

clip_image020

Now generate the certificate based on the request

C:\Data\Projects\Software\OpenSSL-Win64\bin\openssl x509 -req -days 3650 -in server.csr -signkey server.key -out server.crt -extensions SAN -extfile openssl.cnf

clip_image022

Again, enter pass phrase …

Now copy the password protected server key:

copy server.key server.key.copy

Create an unprotected private key:

C:\Data\Projects\Software\OpenSSL-Win64\bin\openssl rsa -in server.key.copy -out server.key

At this time you’ll have an RSA key with the necessary subject and subjectAltName. Let’s put this into our project by changing the bsconfig.json file in the root of the project.

Replace the line "https": true, with the following:

"https": {

"key": "./certs/server.key",

"cert": "./certs/server.crt"

},

Like this:

clip_image024

Don’t forget to save the bsconfig.json file before running npm start as I did, otherwise it still won’t like your certificate as it will point to the old one .

npm start

If all goes well we’ve now fixed the certificate error due to the different naming and our website will run fine (on your local machine on port 3000):

clip_image026

Now we fixed the website we are now ready to run it as a Word Add-in in a Word client. We will go over the steps to do this in my next blogpost.

To be continued

Office Development – Installing and Running Yeoman

Office Development - Yeoman

In the previous two posts around creating your first Word add-in we installed Node JS in the first post Office Development – Installing Node.js and installed Git in the second post Office Development – Installing Git. If you haven’t done this already move along and do that first.

In this post, third in the series of building your first Word Add-in (based on the JavaScript API for Office) we will install and use another tool called Yeoman.

Yeoman

Yeoman used to be a member of the social class in late medieval to early modern England (source wiki: https://en.wikipedia.org/wiki/Yeoman) but these days it is the name for an open source scaffolding tool, released at Google I/O 2012. Yeoman runs as a command-line tool and will provide you with a boiler plate project for several different solutions. Because the software is open sourced you can find it on GitHub: https://github.com/yeoman

Over time there have been created many generators for Yeoman to do all sorts of things such as creating website starters and more. The reason why we discuss it here is because they (the Office Dev Team) also created a generator that allows you to quickly build a Microsoft Office Add-in project using the Yeoman scaffolding tool.

You can use this if you simply want to start creating an add-in with a basic text editor other than Visual Studio. Of course, you can also use more advanced text editors including Visual Studio of Visual Studio Code but just to show you that you don’t need much to create your first add-in you can use this option.

Installation is easy (provided you installed the tools from the other two blogposts):

Open a Command window (Windows Flag, Command) and run:

npm install -g yo generator-office

This will globally (-g) install the Yeoman (yo) package and the Office Generator (generator-office) on your machine. The routine ends in an automatically engaged final check by yodoctor:

clip_image002

You can also check it yourself by running the command:

npm list -g -depth=0

clip_image004

If all went well you should see, as you can see in the picture above, at least yo@<version> and generator-office@<version>.

Now will be the time to generate our first Word Add-in … hooray!

Enter the command line command:

yo office

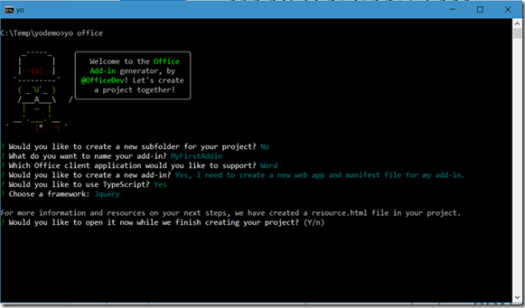
This will kick off a series of questions needed to create your add-in based on your input:

clip_image006

Except for the name I opted to keep the defaults. You can select other than the defaults but for now keeping the defaults is ok.

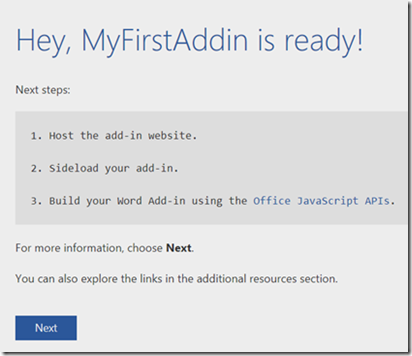
Yeoman starts generating the add-in for you and in the meantime a website is opened with instructions. The instructions take you by the hand and will guide you through the process when the add-in finished generating.

clip_image008

At this time generating your add-in is probably finished, so follow the instructions from the webpage by clicking Next

According to this page the next command should be:

npm start

This will start the local server hosting the add-in at:

https://localhost:3000

As you can see it will be hosted at a ‘secure’ site (https) on port 3000. This ‘secure’ site could give you some headache however. Initially the site needs the firewall to be opened:

clip_image010

I’d recommend unchecking the Public Networks checkbox and only to allow it on your Private Networks for now.

Continuing the process will result in another security issue:

clip_image012

Another no-go? Well, maybe … but let’s click “Details” first and find out what this is all about. So far not a real smooth experience for the novice office add-in developer don’t you think? Go ahead, click “Details”:

clip_image014

Ah! What it says is that your PC doesn’t trust the website’s security certificate … and to be more specific it found that the name of the hostname on the security certificate is different than the one you are trying to visit.

This is quite logical because you are visiting your localhost and the website’s security certificate, as you will find out a bit later, is signed to by “Internet Widgits Pty Ltd” so against all recommendations continue and click the “Go on to the webpage” link.

clip_image016

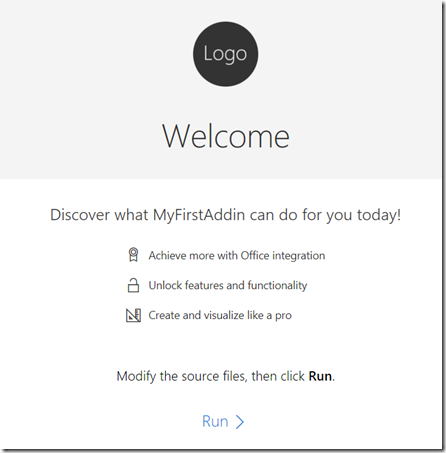
And there you have it! Your first Word Add-in!

“Well, hel-lo … there is no Word here, what do you mean” you might say … and you are right (again).

Although I explained in my earlier blogposts that Add-ins built by using the JavaScript for Office APIs basically are websites hosted in the Office client such as Word you’ve seen here that your really are building a website.

The security issues will however throw a big issue loading this website in the Word client. It will simply be rejected as it appeared to be unsafe to run.

Solving the certificate issue is a story on itself so I will put this in a separate blogpost.

What you’ve seen so far is that you built your new add-in by simply using some web development tools. No Visual Studio installations, nothing of this all. Obviously, you can use Visual Studio to create Office Add-ins, and I will show you that in another series of blogposts. For now we still need to finalize our first journey of creating this Word Add-in but we need to overcome our security issues first.

And therefor, to be continued …

Skip ahead to next Windows 10 release no longer possible

SkipAheadClosed

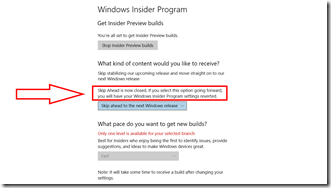
Last week I announced that “Skip ahead to the next Windows release” came available for Windows Insiders at the Windows Insider Program. Well that’s no longer possible.

At the time they already announced that this option would be available for only for the time being and would be closed down after enough participants decided to join in.

One of the reasons is that they still need enough Windows Insiders to participate in the stabilizing process for Redstone 3 aka the Fall Creators Update that we can expect somewhere in September this year and most likely will be versioned as 1709.

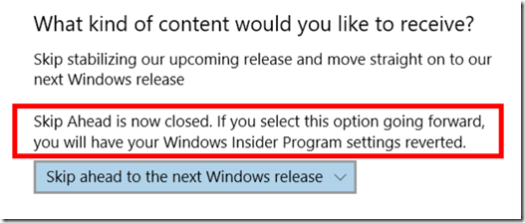
So there you have it:

SkipAheadClosedCropped 

If you are not in already, nothing is lost … you’ll be just helping to stabilize the Fall Creators Update and when this is released the program will be opened up again for all Windows Insiders to join in the new Redstone 4 development cycle.

Be aware though that, especially in the first builds, it can be a buggy experience. First builds tend to be somewhat unstable.

If that is not your thing, it is advised that you stay on the Fall Creators Update for a while longer and maybe join in at a later time. Chances are better receiving a more stable build getting closer to the next release that, if the cadence continues to go on like this, might be here around 1803 (March 2018). But this is just guessing by looking at the stars Winking smile.

SDN Cast 61 with guests Sjoukje Zaal and Alexander Meijers

clip_image002

This week we had guests Sjoukje Zaal and Alexander Meijers at our weekly Dutch SDN Cast episode 61. Sjoukje and Alexander are active in their User Groups SPCNL and MixUG so we discussed the topics in relation to this.

With SPCNL their website will provide an updated view on all things related to SharePoint, Office365, Office and Azure and with MixUG they have a User Group where they organize meetups themed around Mixed Reality and everything related to that.

We discuss subjects like AI, Machine Learning, Cognitive Services, HoloLens, Unity, Vuforia and more. What are the differences between Augmented Reality, Mixed Reality and Virtual Reality? We are diving deep into the subject matter ..

Guest links

Twitter:
https://twitter.com/SjoukjeZaal
https://twitter.com/ameijers

MixUg
http://mixug.nl
https://twitter.com/mixugnl

Spcnl
http://spcnl.nl
https://twitter.com/spcnl

Where can you find our 61th episode of our Dutch SDN Cast?
https://youtu.be/DHTZOadSm-E

Did you subscribe our Dutch SDN Cast channel already?

Subscribe your YouTube channel if you don’t want to miss a single broadcast. Usually we will broadcast on Thursday evenings at 8 PM but there can be a change of plans where we need to move to another time or day. So to be sure Subscribe to our channel on YouTube or go to http://www.sdncast.nl to see when the next episode is due.

Other news:

Windows Subsystem for Linux out of Beta!https://blogs.msdn.microsoft.com/commandline/2017/07/28/windows-subsystem-for-linux-out-of-beta/

Visual Studio for Mac version 7.2 Alpha Preview
https://blogs.msdn.microsoft.com/visualstudio/2017/08/02/visual-studio-for-mac-version-7-2-alpha-preview/

CodePush joins Visual Studio Mobile Center
https://blogs.msdn.microsoft.com/visualstudio/2017/07/31/codepush-joins-visual-studio-mobile-center/

AutoMapper joins the .NET Foundation
https://jimmybogard.com/automapper-joins-the-net-foundation/
http://www.peachpie.io/2017/07/net-foundation-announcement.html

.NET Framework July 2017 Cumulative Quality Update for Windows 10
https://blogs.msdn.microsoft.com/dotnet/2017/08/01/net-framework-july-2017-cumulative-quality-update-for-windows-10/

Events

Upcoming events

Agile 2017 – August 7-11 2017, Orlando FL
https://www.agilealliance.org/agile2017/

Wazug – September 7 2017, Hilversum

Microsoft Edge Web Summit 2017 – September 13, Online
https://summit.microsoftedge.com/

MixUG – Development Event – 13 September, Gouda
https://www.eventbrite.nl/e/tickets-mixug-development-evenement-34890959800

Xamarin Dev Days – 16 September – Amsterdam
https://ti.to/xamarin/dev-days-amsterdam-2017

.NET Conf – 19-21 September
http://www.dotnetconf.net/

Microsoft Envision – September 25-27 – Orlando
https://www.microsoft.com/en-us/envision/default.aspx

Ignite 2017 – September 25-29 – Orlando
https://ignite.microsoft.com

Hybrid IT Event – September 26 – Maarssen, NL
http://www.fujitsu.com/nl/microsites/hybrid-it/event/index.html

MixUG – End User Event
https://www.eventbrite.nl/e/tickets-mixug-eindgebruikers-evenement-34890983872

SDN Event 3 – October 6, Zeist, NL
https://www.sdn.nl/EVENTS/6-oktober-2017

TechDays October 12-13, 2017 RAI Amsterdam 
http://www.techdays.nl/
https://techdays.msnlevents.net/content/eventselection.aspx?eventid=26152

SharePoint Saturday Belgium 2017, October 21, Brussels BE
http://www.spsevents.org/city/brussels/brussels2017

SharePoint Unite – October 24-26, 2017, Haarlem
https://sharepointunite.com/

Web Summit – 6-9 November 2017, Lissabon, Portugal
https://websummit.com/

Visual Studio Live! November 12-17 2017 Orlando, FL
https://live360events.com/events/orlando-2017/vslive.aspx

As usual we are always looking for presenters for our own events and Meetup’s so if you want to share something about hot technologies or just about something you implemented at work or in an App that could be interesting to our audience let us know so we can schedule you for one or our next SDN events or Dutch .NET Group Meetups.

This off course also goes for if you want to write a great article for us to publish in our SDN Magazines or at our SDN Website. The downside of publishing a magazine article is that there can be some time between writing the article and publishing the magazine. So, if it is time critical sometimes the best option is to publish it on the www.sdn.nl website to get more speedy attention to the article.

As you see, options enough to address your audience with top notch information. You can even, if you like, be our guest in our SDN Cast shows to discuss the projects you are working on or other topics you master. We will instruct you how to connect with us and what it is you need to join the show.

Hopefully we will see you at our weekly web cast, for the schedule go to www.sdncast.nl for next week’s announcement to find out the day and time of our next broadcast or go to www.sdncast.nl/youtube to watch old episodes and videos that we recorded at our events. Don’t forget to subscribe our YouTube channel www.sdncast.nl/subscribe or go directly to YouTube not to miss any of our shows!

Office Development – Installing Git

Office Development - Git

In our previous step to build our first Word Add-in with JavaScript for Office we installed Nodejs. Today we continue with installing Git. Over time there will not be a need to install these tools again, by then you will be a professional web developer living in the world of these tools and probably have these installed already before jumping into another project.

For now I assume you didn’t have the tools installed, but you can check on the command line with the command:

git –version

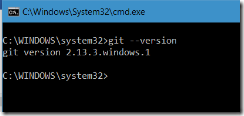
If you already installed Git you probably see something like this:

clip_image002

You can find the Git installer just by GoogleBinging for “Git” and this will lead you to:

https://git-scm.com

Now, on the right you see a nice downloader button that selects your installer based on the machine that you are on. Click this, and hit Run (usually you wouldn’t be so dumb and save the downloader first on your machine in order to have the anti-virus checker check your download but for now we just let it run #yolo … )

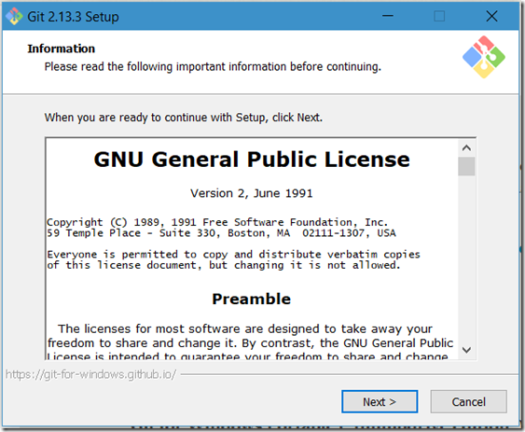
clip_image004

As usual the first dialog you’ll see are the GNU License terms, your only option is to agree by clicking next or abandon the installer and start reading a good book and continue living your life without the software. Today we’ll decide to go on however …

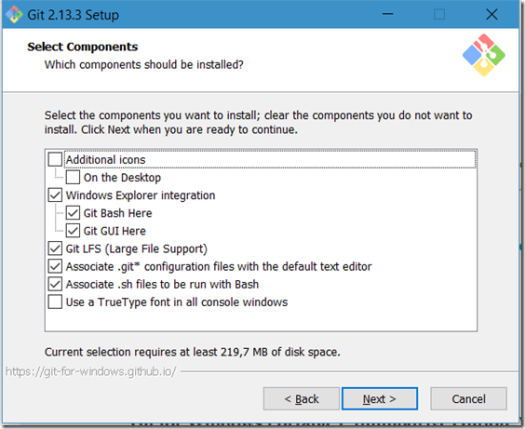
clip_image006

Now select a few components. You can add some icons to the desktop and I opt for the settings to add Windows Explorer Integration and the other defaults.

clip_image008

I also have it install the icons on the desktop for quick access, you can always throw ‘em in the bin if you think they are in your way.

clip_image010

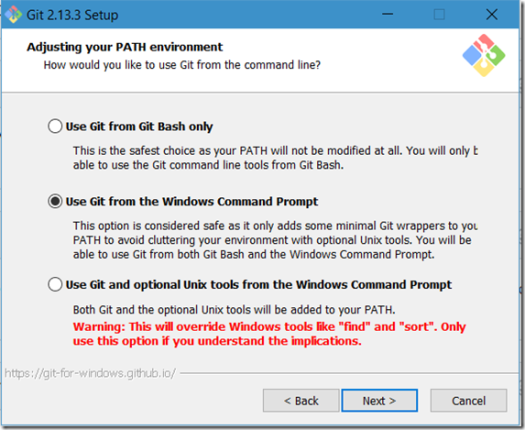
The next dialog above is for adjusting the PATH environment. My option is to “Use Git from the Windows Command Prompt”. Note that with this option you’ll be able to use both Git Bash

Bash what? …

Ok, ok, I know, if you are native from Windows you probably won’t even know what Bash is. For now, you don’t need to know other than that this is some sort of a Linux command line option.

Don’t worry, you get the hang of it once you are moved over to the ‘other side’.

clip_image012

Choosing the HTTPS transport backend I opted to “Use the native Windows Secure Channel library” (just because we are still in the mood of Windows, you can change this later if you like).

clip_image014

Configuring the line ends I leave the default as it was the recommended setting on Windows “Checkout Windows-style, commit Unix-style line endings”

You already noticed it, there is a lot of Unix influencing here … Bash, LineFeeds … it takes me back to the time I studied Computer Science. #throwbackwednesday

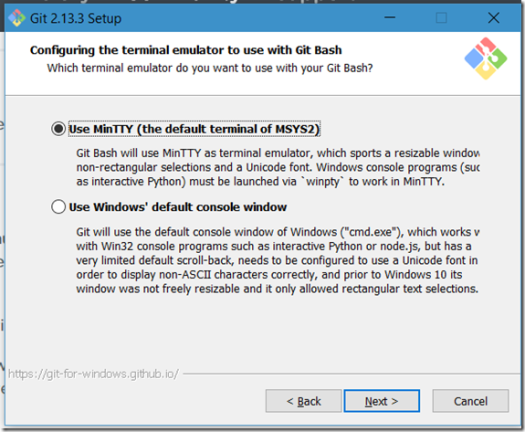
The next dialog is no different. Configure the terminal emulator to use with Git Bash

clip_image016

The option selected allows you to use both MinTTY as terminal emulator as the common Windows Console (“cmd.exe”).

clip_image018

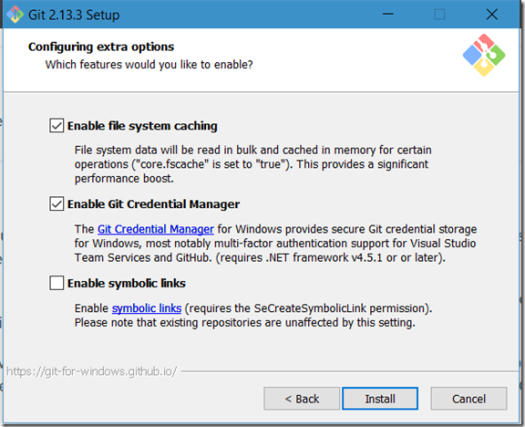
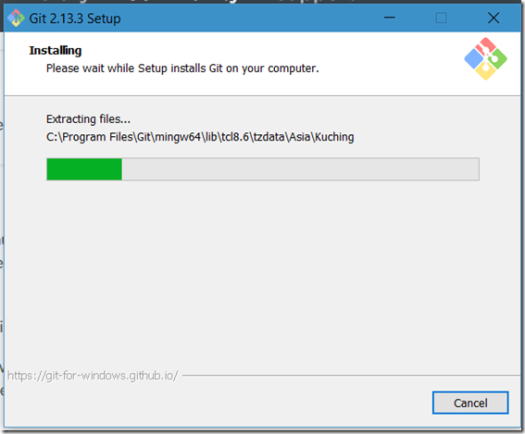
Again, select the defaults to enable file system caching and enabling the Git Credential manager. Hitting Install will kick off the Git Installer to install all the selected options you entered on the dialogs above:

clip_image020

clip_image022

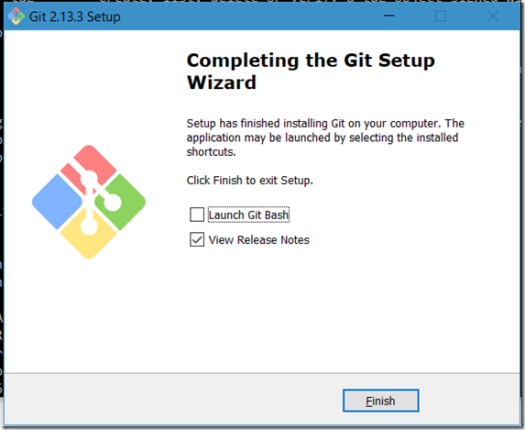
Done, if you want to have a quick view at what Bash is tick the option to Launch Git Bash. Otherwise it will just lead you to the Release Notes (if you didn’t remove the check before “View Release Notes” that is). You now have Git on your machine, check the version again by running git –version again.

You should see this (or a newer version if you read this later than the day of the blogpost):

clip_image002[1]

Ready to go into the next step to install Yeoman.

Yeoman whaaaaaaaaaaaaaat?

Yes, Yeoman … more in my next blog post.

Hang in there and see you tomorrow! You get used to it … let it all get into your system, GoogleBing it a bit for some extra context, perform all the steps from above doing it yourself and be ready for the next step.

%d bloggers like this: