In my previous post about session recording I explained how we recorded straight to Google Hangouts. This time there is a slight change of plans … we replaced Google Hangouts by YouTube Live through OBS Studio. Also we no longer require the presenter to login to Google Hangouts. Instead we now use the Elgato HD60S HDMI Splitter/Game Capture Device to capture the presenters screen so there won’t be any lag caused by Google Hangouts while presenting. Google Hangouts could negatively impact the performance of the presenters’ PC because the video processing can be a heavy impact if the PC or laptop does not have a fast video card inside.
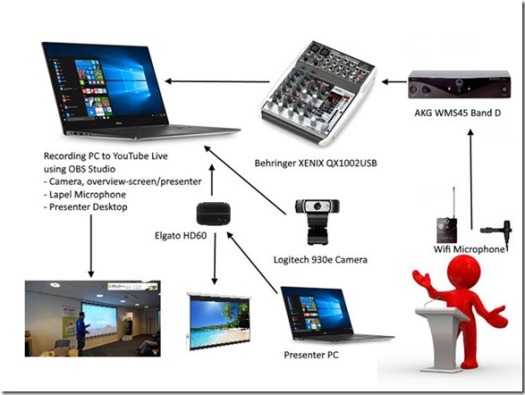
New Recording gear setup with OBS Studio:
By using OBS Studio (or other production/broadcasting/recording software such as vMix that I use in our weekly SDN Cast recordings) we can simultaneously record our session to local disk and as an option broadcasting it to YouTube Live. The recording PC in this case is connected to the YouTube Live stream, the presenter is just sending his desktop images to the beamer over the Elgato HD60S Game Capture device.
My gear list as used so far with the configuration in the picture above:
- One recording laptop
OBS Studio - One monitor laptop (optional)
- Behringer XENIX QX1002USB
Power Supply
6.35 mm Jack to 3.5 mm headphone adapter
USB Cable - AKG WMS45 Band D Wireless Microphone Set
Power Supply
Wireless Microphone
XLR Cable Male/Female - Logitech 930e HD Web Cam
USB Extension Cable (Optional) - Camera Stand/tripod
- Elgato HD60S
- USB Hub (Optional, if your laptop does not have enough ports)
- Headphones
- One presenter laptop to share his desktop
Installing the recording gear:
Put the camera in front of the presenter covering both the projector screen and the presenters desk. Be careful not to put the camera too much into the viewing field of the audience. The optional USB extension cord can help here.
The camera is small, so not really an issue as it seems. This camera will be the ‘overview’ camera setup showing both the presenter walking around, sitting down at his desk as well as the big screen from the beamer.
The wireless microphone is pinned on the presenter for near field voice recording, don’t hurt him by clipping it on his skin. This microphone will record his story telling voice, picked up by the AKG WMS45 wireless receiver set and dropped into the Behringer XENIX QX1002USB.
The Behringer will provide the sound USB input channel for the recording ‘source one’ combined with the video from the camera ‘overview’ output by the Logitech 930.
The recording PC will be logged in as video producer to YouTube Live (optional) and you will be able to switch between sources, big screen and presenter or desktop view using OBS Studio.
An example of a session recording (this recording is in English BTW):
”Fanie Reynders – Rest-ful APIs with ASP.NET Core”
https://youtu.be/rsgwUsfD2-A
A full playlist of all our (Dutch and English ) recorded sessions so far can be found here if you want to see more:
https://www.youtube.com/playlist?list=PLC5P51a_60YElMJvidAy7GagDJH0Y-UwX
What you see in this example video is that we can switch between the big picture on the overhead screen and jump into detail by showing the desktop from the presenter laptop to get a good readable picture of the slides or even when there is live coding going on.
With OBS Studio you can setup multiple screens consisting of several inputs, images, cameras or videos to create a compelling view. You can even add some sponsor information in the screens. While directing your recording you can switch between the screens that you prepared with all the sources.
So, is all good now, doing it this way with the improved inputs sharing the HDMI signal on the Elgato HD60S?
Well, we lost the issue that the presenter experienced some delays on his PC due to the video processing. No need to log in as presenter, no need to have a Google Account available to do so. It is closer (for the presenter, at least) to the zero-configuration solution.
With the setup above you can broadcast your sessions through YouTube Live and record on your local hard drive to share after the event. If you are afraid to broadcast live and for example think about the risk of getting a lower number of attendees (why going to the event, it is broadcasted live) the session can be just recorded without going into YouTube Live and you can decide to upload the video only after the event is over (this also gives you the option to edit the footage, adding annotations, start or end screens and upload the edited footage for you to share as public video).
I really hope this post will encourage you to try the same thing what we did and get more of the community efforts recorded and to get more of our valuable arranged sessions shared to a larger audience. The information is way too valuable not to share!
If you want to comment on this setup, share improvements, have questions or just want to say something, leave your comments below on this post!


One Reply to “How to record your user group presentations in high quality with low budget tooling – Part II”