Every three months we at SDN manage to pull off SDN Events, full day four track, five sessions a track with great Dutch and some occasional international speakers showing off their great content to our attendees.
Last year we started to record some of these sessions, first ones to try out as proof of concept, but now in production already to share our content to a bigger audience.
I was asked more than once how we were able to record our SDN Event session recordings in relatively high quality with only some low budget tools. So here it is so far.
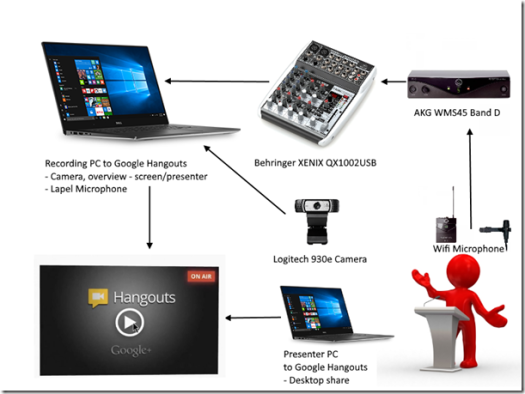
Recording gear setup:

This has been our setup up as we used it until today, but for the next event we will try something else for the reasons you will read at the end of this blog post. I guess we will continue to tinker with the setup until it is just perfect. This change will be the subject of another blog post, but only if all of this tinkering actually appeared to work for us. No need to bore you with something that does not work properly.
Right now we use two Google Hangout logins per recording, one from the ‘recording device’ (actually the device is not recording, Google Hangouts/YouTube is doing the recording for us) and one login from the laptop used by the presenter.
The ‘recording device’ is logged into Google Hangouts with the recorded projector screen and presenter and presenter voice using the Logitech webcam and wifi microphone set. The presenter logs into Google hangouts with his own laptop, sharing the desktop, providing a high quality representation of what is shown on the projector screen.
My gear list as used up to today with the configuration in the picture:
- One recording laptop and a Google ID
- Behringer XENIX QX1002USB
- AKG WMS45 Band D Wireless Microphone Set
- Logitech 930e HD Web Cam
- One presenter laptop to share his desktop
Installing the recording gear:
Put the camera in front of the presenter covering both the projector screen and the presenters desk. Be careful not to put the camera too much into the viewing field of the audience.
The camera is fairly small, so not really an issue as it seems. This camera will be the ‘overview’ camera setup showing both the presenter walking around, sitting down at his desk and the big screen.
The wireless microphone is pinned on the presenter for near field voice recording, don’t hurt him by clipping it on his skin. This microphone will record his story telling voice, picked up with the AKG WMS45 wireless receiver set and dropped into the Behringer XENIX QX1002USB. The Behringer will provide the sound USB input channel for Google Hangout ‘source one’ combined with the camera ‘overview’ output by the Logitech 930.
The presenter is also logged in to Google Hangouts as ‘second source’. This will be full time sharing his desktop.
The main recording device will be logged in as video producer and you will be able to switch between sources, big screen and presenter or desktop view.
An example of a session recording (this recording is in English b.t.w.) :
”Mr. Moffat – Introducing Microsoft Power BI”
https://www.youtube.com/watch?v=B_bQ_EivYb4
A full playlist of all our (Dutch and English ) recorded sessions so far can be found here if you want to see more:
https://www.youtube.com/playlist?list=PLC5P51a_60YElMJvidAy7GagDJH0Y-UwX
What you see in this example is that we are able to switch between the big picture on the overhead screen and jump into detail by showing the desktop from the presenter laptop to get a good readable picture of the slides or even when there is live coding going on.
So is all good, doing it this way?
No, we are still learning and we found some downsides with this configuration (maybe more, but this is the main one) and that is that you require the presenter to log into Google Hangouts and therefor he needs a Google ID. This means that this is not a zero configuration solution to the speaker invited to do his session.
It seemed not everyone owns a Google ID. Also, it can be somewhat cumbersome to the presenter to log into Google Hangouts, disable his camera and recording microphone (check this ahead of time before the recording starts, as this will cause a critical echo caused by getting two sources at once, one over the wireless mic the other through the presenter laptop mic. So the last one has to be disabled. Also there is a small amount of his resources used to run the Hangout in the background. This could affect the responsiveness a little bit and maybe interfere a bit on high resource claiming presentations (for instance if he needs to compile a bit of code in the demos).
With the setup above you are able to live broadcast your sessions and immediately record it as is to share after the event. If you are afraid to broadcast live risking a lower number of attendees (why going to the event, it is broadcasted live) you can record the session private or unlisted and expose the video only when the event is over (this also gives you the option to record the session, download the video and edit the footage adding annotations, start or end screens and upload the edited footage to share as public video).
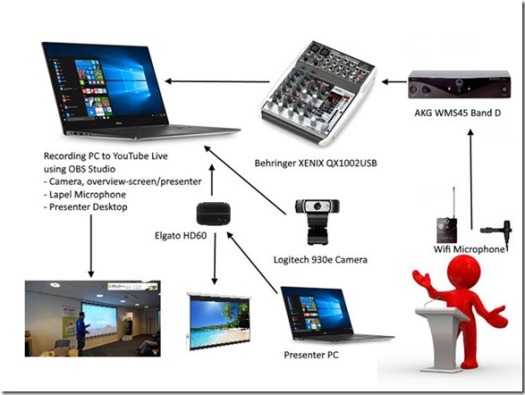
To get around the issues mentioned above we will test a slightly changed configuration by adding en extra device. But as said, I will explain this later on, when tested and with proof of recording properly.
I really hope this post will encourage you to try the same thing what we did and get more of the community efforts recorded and to get more of our valuable arranged sessions shared to a bigger audience. The information is way too valuable not to share!
If you want to comment on this setup, share improvements, have questions or just want to say something, leave your comments below on this post!
Like this:
Like Loading...


