Yesterday in my blog a short introduction to Script Lab, the Microsoft Garage project to work in some sort of a playground to develop your JavaScript for Office scripts so you can test-drive your code that you plan to use in your Add-in.
Today I will go over the installation process of Script Lab. Step by step I’ll follow the instructions and see what this looks like. How hard can it be ‘ey?
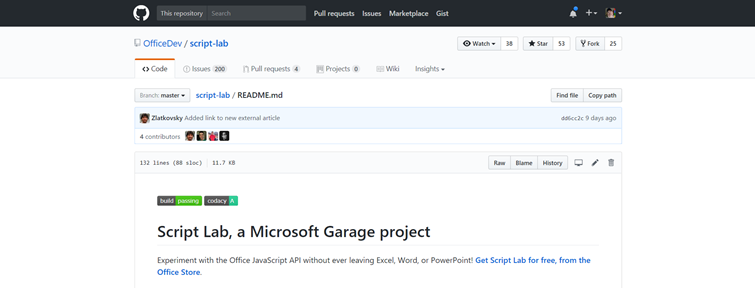
To start installing navigate to https://aka.ms/getscriptlab. It looks like this:

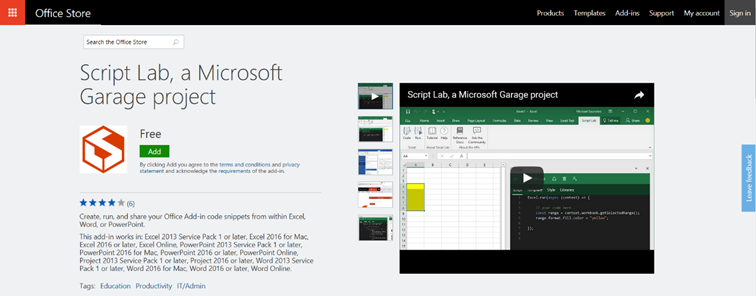
Click the Add button to arrive at the guided installation page:

To stay in the mood, we select Word again. I’ll will be using other clients like Excel or PowerPoint soon, but to be consistent I’ll select Word again. This will provide you with a comparable environment and maybe you get used to it. Now, to open in Word click the “Open in Word” option. This will ‘warn’ you that you are about to switch applications:

As this is the plan, you want to move into Word instead of staying in Microsoft Edge. Select ‘Yes’ to go on. This will launch Microsoft Word 2016 (assuming you have Office 2016 installed):

A document is opened, but not without warning. Because you open the document from the dark and dangerous Internet you are provided with a warning and start in the Protected View of Office:
![]()
In this case we tend to trust Microsoft in this we continue our journey by pressing “Enable Editing” but now we run into a second warning because the document also contained a Task pane that wants to run the Script Lab Add-in.

Again to make you feel safe, you don’t want any add-in to kick in without your confirmation, you get the option to “Trust this add-in” or “See Details”.

If you click “See Details” they bring you back to base. The installer page is provided where you can read information about the add-in. I guess you already did that, otherwise you wouldn’t get this far in the installation process (unless you just trusted my simple introduction and went ahead ). For now, not all that interesting, so we close this and leave it for what it is.

We go ahead, and decide to trust this add-in. This will bring us the Script Lab tab:

Showing you a balloon with the text “Code, Run and share your Add-in snippets directly from Office” and a “Got It” button to confirm:

Click the Script Lab and you’ll see a ribbon appear with the options:
Code, Run, Tutorial, Help, Reference Docs and Ask the Community

The most obvious thing to do would probably be to go through the Tutorial, at least that was what I picked as a starting point. The interesting thing is however that the Tutorial brings you to an Excel environment to explain you what you can do with the Add-in:

You basically go through all the same steps again, but ending up in Excel showing you all the same options. Open a script-lab-tutorial.xlsx from script-lab.azureedge.net :
![]()
This is an Excel starter document with more information about the Add-in and guiding you through the options:

Again the little Protected View warning and the Enable Editing button.

It didn’t provide me with the Script Lab Add-in tab though, only the instructions that you also saw when running the Word installer, except now for Excel.

This wasn’t really what I was looking for, probably useful if I just started from Excel but I didn’t. I went through the GitHub issues and noticed that getting a Word Tutorial is still in planning. Some patience here.
For now, at least the Word Script Lab Add-in is installed and ready to use.
To be continued


![clip_image002[1]](/wp-content/uploads/2017/08/clip_image00211-1.png "clip_image002[1]")


